print()主要流程剖析
实际这个测试文件test.py就一行代码:print('Hello World!')。
print('Hello World!')
相关的字节码为:
  1           0 LOAD_NAME                0 (print)
              2 LOAD_CONST               0 ('Hello World!')
              4 CALL_FUNCTION            1
              6 POP_TOP
              8 LOAD_CONST               1 (None)
             10 RETURN_VALUE
实际的主要函数调用逻辑图如下图所示,使用的cpython代码基线版本为v3.11。 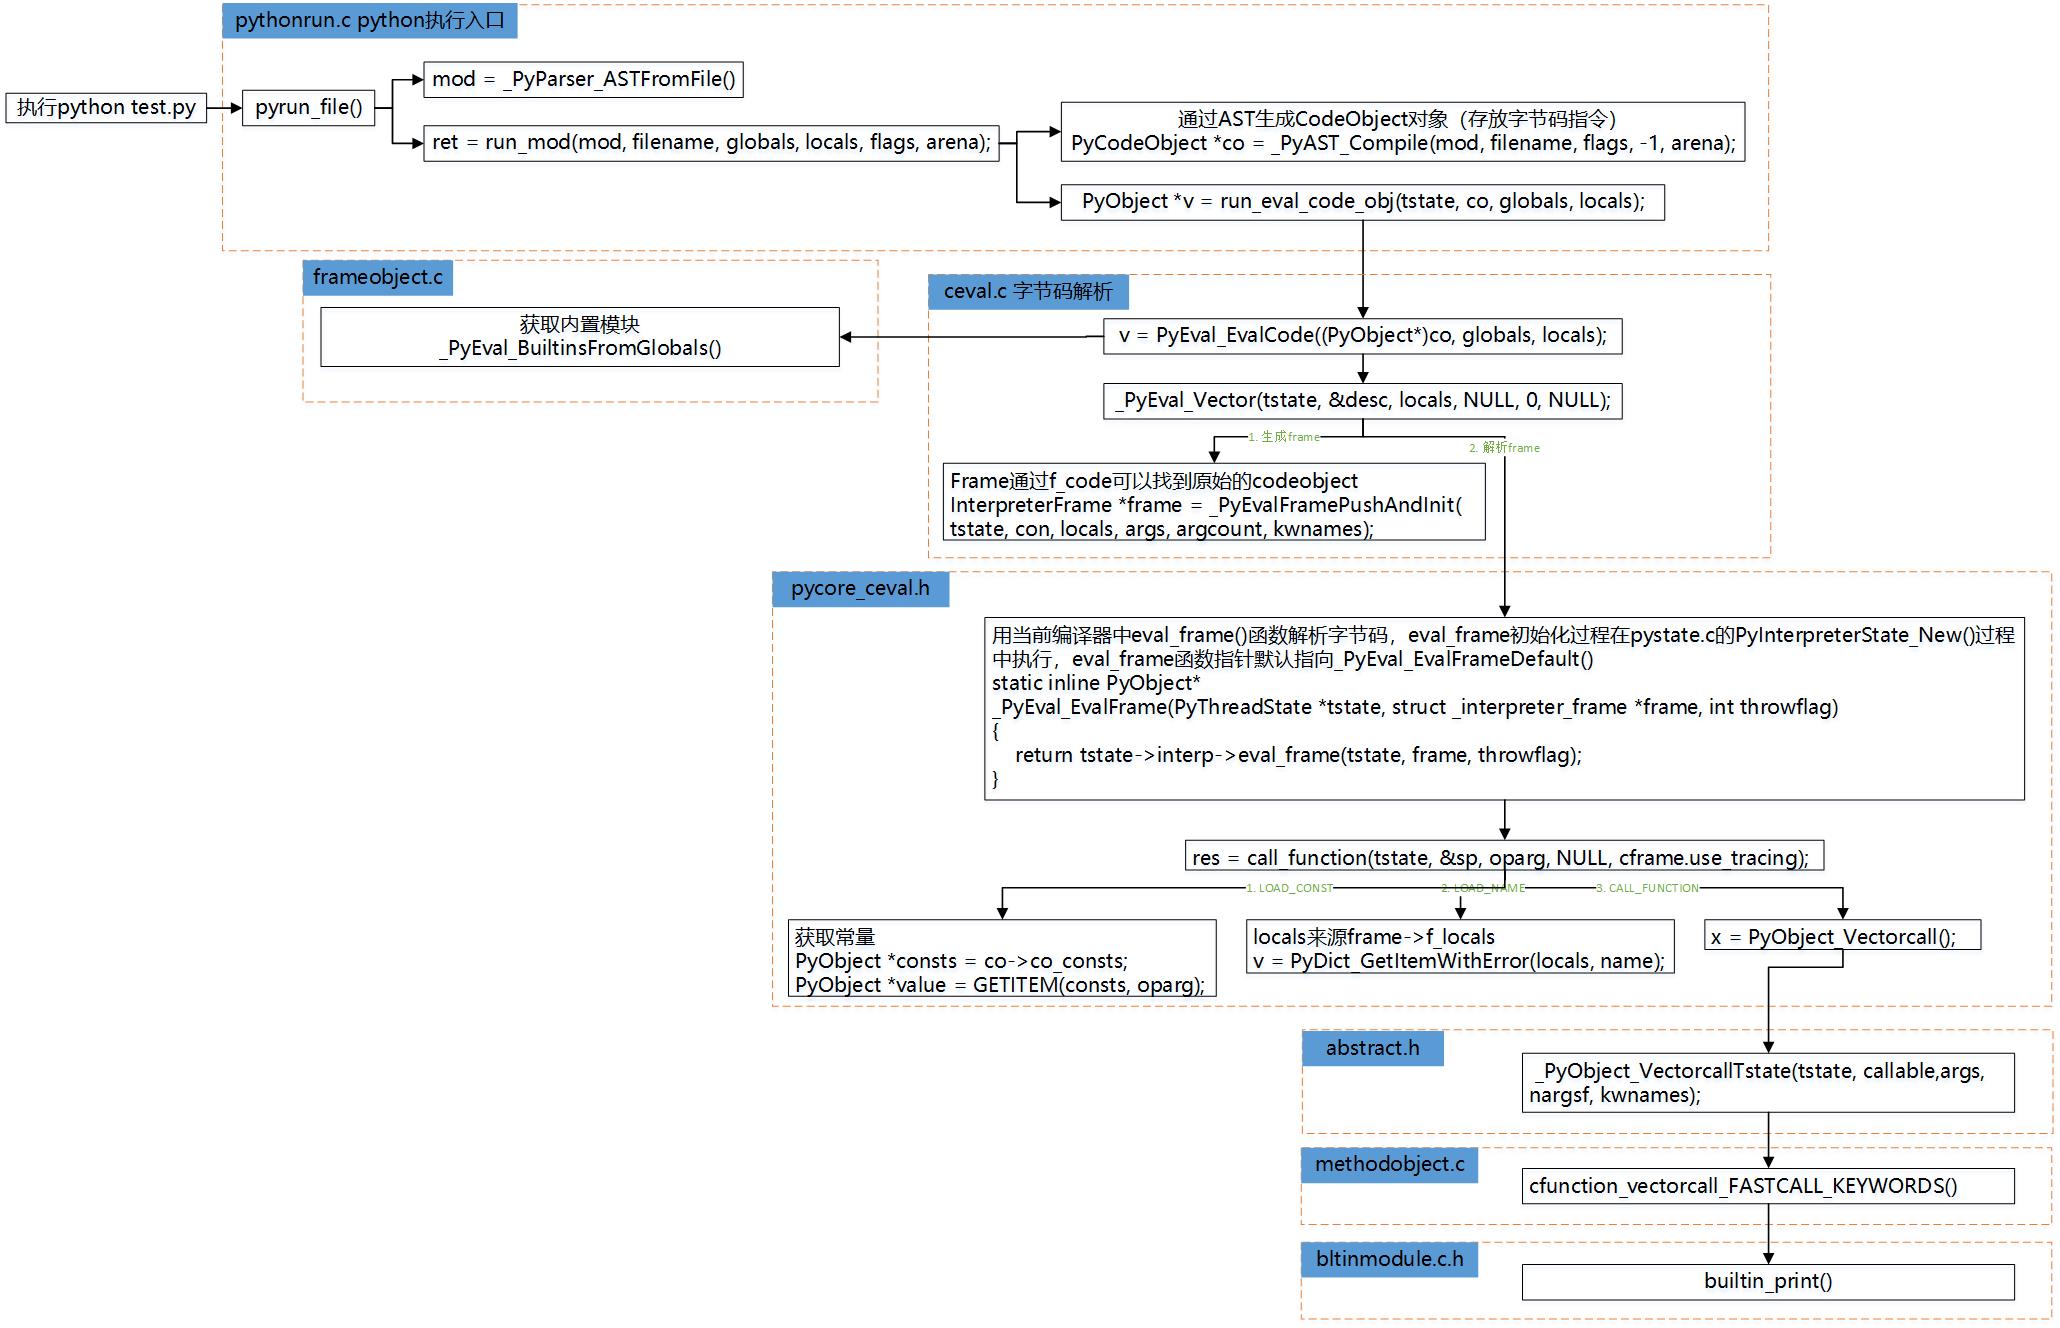
深入拓展篇
codeobject生成过程剖析
将test.py内容修改为:
def test():
    print('Hello World!')


def test1():
    print('Hello World!')

test()
test1()
则此时的字节码为:
  1           0 LOAD_CONST               0 (<code object test at 0x7f75a94e4040, file "test.py", line 1>)
              2 MAKE_FUNCTION            0
              4 STORE_NAME               0 (test)

  5           6 LOAD_CONST               1 (<code object test1 at 0x7f75a94e4440, file "test.py", line 5>)
              8 MAKE_FUNCTION            0
             10 STORE_NAME               1 (test1)

  8          12 LOAD_NAME                0 (test)
             14 CALL_FUNCTION            0
             16 POP_TOP

  9          18 LOAD_NAME                1 (test1)
             20 CALL_FUNCTION            0
             22 POP_TOP
             24 LOAD_CONST               2 (None)
             26 RETURN_VALUE

Disassembly of <code object test at 0x7f75a94e4040, file "test.py", line 1>:
  2           0 LOAD_GLOBAL              0 (print)
              2 LOAD_CONST               1 ('Hello World!')
              4 CALL_FUNCTION            1
              6 POP_TOP
              8 LOAD_CONST               0 (None)
             10 RETURN_VALUE

Disassembly of <code object test1 at 0x7f75a94e4440, file "test.py", line 5>:
  6           0 LOAD_GLOBAL              0 (print)
              2 LOAD_CONST               1 ('Hello World!')
              4 CALL_FUNCTION            1
              6 POP_TOP
              8 LOAD_CONST               0 (None)
             10 RETURN_VALUE
和上面的test.py文件比对,大家可以发现实际此处的字节码比上面多了codeobject。那codeobject的作用是啥?实际各位大概率已经看到过这个内容,那就是在执行python文件的时候会实时生成xxx.pyc文件,这里面存放的内容就是codeobject序列化的结果。上面test.py实际会生成3个codeobject对象,一个是test.py对应的codeobject,另外两个codeobject则对应两个函数。通过pyc我们其实也可以将程序运行起来,这个过程实际就是跳过了前面的编译过程直接从codeobject开始转换到frameobject对象(栈帧对象)并ceval解释执行。
那这个codeobject又是怎么产生出来的呢?今天我们结合python编译器最新代码走读一下主要流程。
我们可以详细看一下peg_api.c这个文件,此文件内就两个函数,主要目标只有一个:生成AST语法树(返回的结构体叫mod_ty,目前不知道中文怎么称呼比较合适~)。这实际也是python 3.10引入的新特性,所有语法解析活动都由PEG过程来处理直接,为什么这么做比较好我没好好仔细研究,此处略去不坑大家了。
在老的python版本其实大家查一下ast.c中的代码可以找到AST相关生成的函数,比如:mod_ty PyAST_FromNodeObject(const node *n, PyCompilerFlags *flags,PyObject *filename, PyArena *arena),这个函数的作用实际就是从CST中生成AST(mod_ty)对象。最后生成的AST(mod_ty)对象又经过PyCodeObject *co = _PyAST_Compile(mod, filename, flags, -1, arena);就生成了codeObject对象,里面细节我就不展开了,都是模板化的代码编译流程。
还有二个问题,刚开始学的时候我容易搞迷糊:
1.三个codeobject通过什么关联起来?
codeobject里面有个co_consts属性,其指向的是一个tuple,所以代码文件里面的codeobject都放到这个tuple中。
2.指令放到codeobject对象的那个属性里面?
co_code中存放opcode指令码。
frameobject生成过程剖析
frameobject实际是字节码执行的运行时堆栈。interpreterFrame的结构体如下代码所示。f_globals和f_locals是__main__模块的m_dict。f_code指向生成此frame对象的codeobject对象,previous指向当前的tstate->frame,后面一步就会将当前frame更新为当前生成的frame(frame的维护可以看_PyEvalFrameClearAndPop)。frame_obj指向frameobject对象, frameobject的创建使用了懒加载策略,具体创建过程可以见PyThreadState_GetFrame函数。
typedef struct _interpreter_frame {
    PyObject *f_globals;
    PyObject *f_builtins;
    PyObject *f_locals;
    PyCodeObject *f_code;
    PyFrameObject *frame_obj;
    /* Borrowed reference to a generator, or NULL */
    PyObject *generator;
    struct _interpreter_frame *previous;
    int f_lasti;       /* Last instruction if called */
    int stackdepth;  /* Depth of value stack */
    int nlocalsplus;
    PyFrameState f_state;       /* What state the frame is in */
    PyObject *stack[1];
} InterpreterFrame;

struct _frame {
    PyObject_HEAD
    struct _frame *f_back;      /* previous frame, or NULL */
    struct _interpreter_frame *f_frame; /* points to the frame data */
    PyObject *f_trace;          /* Trace function */
    int f_lineno;               /* Current line number. Only valid if non-zero */
    char f_trace_lines;         /* Emit per-line trace events? */
    char f_trace_opcodes;       /* Emit per-opcode trace events? */
    char f_own_locals_memory;   /* This frame owns the memory for the locals */
};
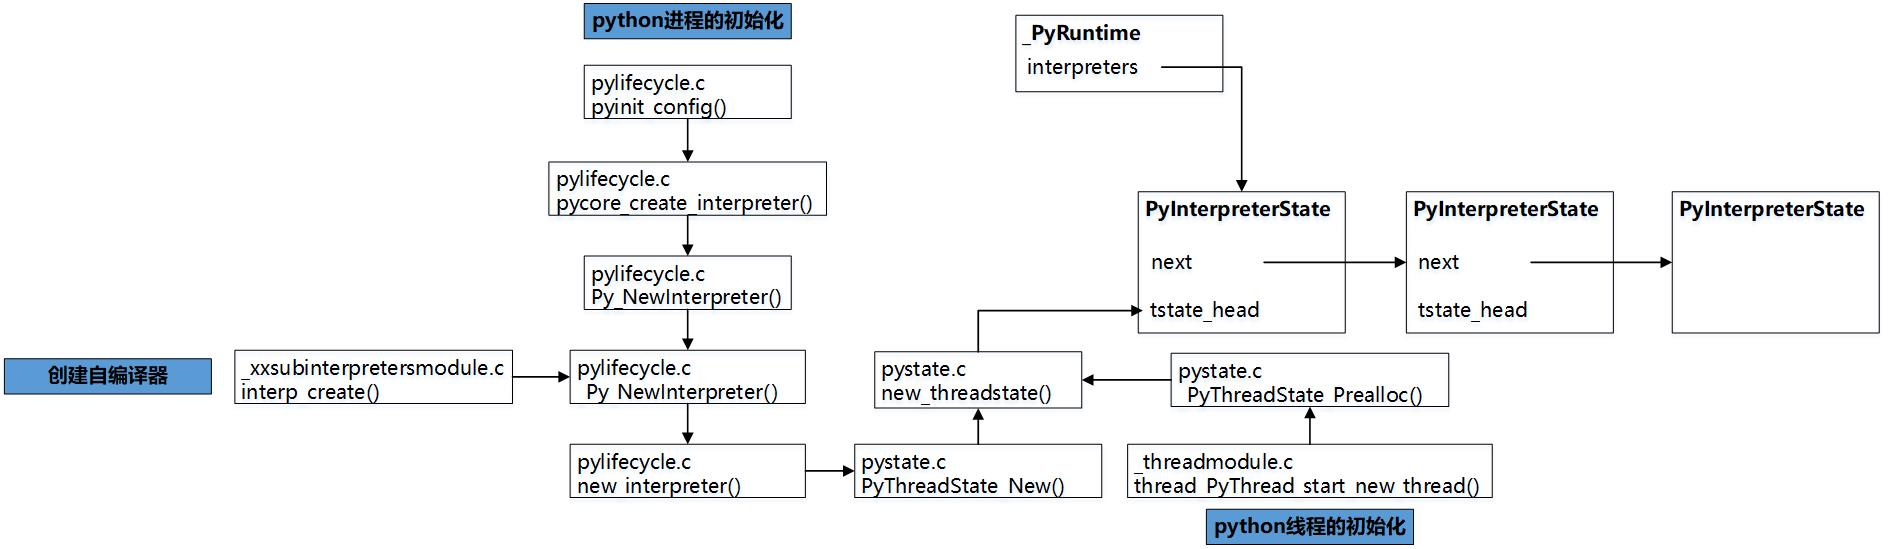
子编译器中打印Hello World!过程剖析
将代码改为如下内容:
from textwrap import dedent
import _xxsubinterpreters as interpreters


script = dedent(f"""
    print('Hello World!')
    """)

# interpreters.create()对应_xxsubinterpretersmodule.c中的interp_create()
interp = interpreters.create()
result = interpreters.run_string(interp, script)
实际的interpreter的创建调用链可以看下图。